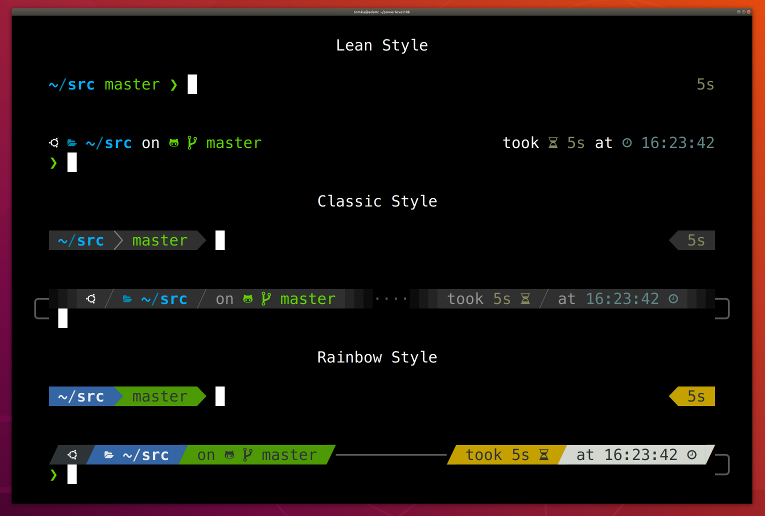
When working with the command line, a well-customized terminal can significantly boost productivity and efficiency. In this Advanced Terminal Customization Guide, we’ll explore how to personalize your terminal environment for improved aesthetics, usability, and performance.
Why Customize Your Terminal?
A well-configured terminal allows for:
- Faster navigation and command execution
- Enhanced readability with themes and fonts
- Efficient workflow through automation and shortcuts
- Better organization of multiple sessions
Let’s dive into some advanced customization techniques!
1. Choosing the Right Terminal Emulator
The first step is selecting a terminal emulator that supports customization. Here are some of the best options:
- Alacritty – GPU-accelerated and highly performant
- Kitty – Fast, feature-rich, and scriptable
- WezTerm – Supports tabs, panes, and GPU rendering
- iTerm2 (Mac) – Advanced features like split panes and scripting
- Windows Terminal – Modern UI with support for multiple shells
Each of these offers different customization levels, so pick one that aligns with your workflow.
2. Powering Up Your Shell
Your shell plays a crucial role in terminal efficiency. Here are the top choices:
- Zsh – Feature-rich and works seamlessly with plugins (Oh My Zsh, Zinit)
- Fish – Smart suggestions, syntax highlighting, and ease of use
- Bash – Default on many systems, highly configurable
Installing and Setting Zsh as Default
sudo apt install zsh -y  # Debian/Ubuntu
chsh -s $(which zsh)  # Change default shell
For Mac users:
brew install zsh3. Using a Plugin Manager
A plugin manager makes customization easier. Popular choices include:
- Oh My Zsh – The most popular Zsh framework
- Zinit – Faster and more customizable
- Antigen – A lightweight plugin manager
To install Oh My Zsh:
sh -c "$(curl -fsSL https://raw.githubusercontent.com/ohmyzsh/ohmyzsh/master/tools/install.sh)After installation, you can enable themes and plugins via the ~/.zshrc file.
4. Theming Your Terminal
Adding a theme improves aesthetics and readability. Consider using:
- Powerlevel10k – A fast and highly configurable Zsh theme
- Dracula – A beautiful dark theme available for multiple apps
- Nord – A minimalist and eye-friendly theme
Installing Powerlevel10k
git clone --depth=1 https://github.com/romkatv/powerlevel10k.git ${ZSH_CUSTOM:-$HOME/.oh-my-zsh/custom}/themes/powerlevel10k

echo 'ZSH_THEME="powerlevel10k/powerlevel10k"' >> ~/.zshrc
source ~/.zshrc5. Enhancing Productivity with Aliases and Functions
Aliases save time by shortening frequently used commands. Add these to ~/.zshrc or ~/.bashrc:
alias ll="ls -la"
alias gs="git status"
alias v="nvim"
For more advanced automation, create functions:
mkcd() {
  mkdir -p "$1" && cd "$1"
}
6. Adding a Multiplexer: Tmux
Tmux allows for session management and window splitting. Install it using:
sudo apt install tmux  # Debian/Ubuntu
brew install tmux  # macOS
Basic commands:
tmux new -s mysession→ Create a new sessiontmux attach -t mysession→ Attach to a sessiontmux kill-session -t mysession→ Kill a session
Enhance it with the Tmux Plugin Manager (TPM):
shCopyEditgit clone https://github.com/tmux-plugins/tpm ~/.tmux/plugins/tpm
Load plugins by pressing Prefix + I inside tmux.
7. Enabling Syntax Highlighting & Autosuggestions
Improve usability by adding:
- zsh-syntax-highlighting – Highlights commands as you type
- zsh-autosuggestions – Provides command suggestions based on history
Install both with:
git clone https://github.com/zsh-users/zsh-syntax-highlighting.git ${ZSH_CUSTOM:-$HOME/.oh-my-zsh/custom}/plugins/zsh-syntax-highlighting

git clone https://github.com/zsh-users/zsh-autosuggestions ${ZSH_CUSTOM:-$HOME/.oh-my-zsh/custom}/plugins/zsh-autosuggestions
Then enable them in ~/.zshrc:
plugins=(git zsh-syntax-highlighting zsh-autosuggestions)Restart your terminal with:
source ~/.zshrc8. Using Starship for a Cross-Shell Prompt
Starship provides a fast, customizable prompt that works with Bash, Zsh, and Fish.
Installation:
curl -sS https://starship.rs/install.sh | shAdd this to ~/.bashrc or ~/.zshrc:
eval "$(starship init zsh)"9. Customizing Fonts for a Better Look
For proper icons and aesthetics, install Nerd Fonts:
brew tap homebrew/cask-fonts
brew install --cask font-hack-nerd-font
Or download from Nerd Fonts and apply it in your terminal settings.
10. Automating with Dotfiles
Dotfiles allow for easy backup and sync of your customizations. Consider using:
- GitHub dotfiles repo to version-control your configs:
git init --bare $HOME/.dotfiles
alias config='/usr/bin/git --git-dir=$HOME/.dotfiles/ --work-tree=$HOME'
config add .zshrc .tmux.conf
config commit -m "Initial commit"
config push origin main- chezmoi for managing dotfiles across multiple systems:
brew install chezmoi
chezmoi init https://github.com/yourusername/dotfiles.git
Final Thoughts
Customizing your terminal is an investment in productivity. Whether you’re improving your shell, adding themes, or automating workflows, these enhancements will make your CLI experience faster and more enjoyable.
Next Steps
- Try out different shell themes and plugins
- Experiment with Tmux for better workflow management
- Use dotfiles to maintain consistency across devices
What’s your favorite terminal customization? Let me know in the comments!
For those looking for high-quality mechanical keyboards and accessories to enhance your development setup, check out this collection on Amazon.


Leave a Reply